This assignment will see you creating a GUI application, based upon the map viewer you created for the previous assignment. Although the main challenge of the assignment is to create a working GUI, the project will also deepen your practical knowledge of classes and the Java core. You may work by yourself on this assignment or with a partner, but you may not work with the same partner as you did for the last assignment (or any previous assignments).
If you work with a partner, each of you will enter the project with alternate versions of MapGrid and MapViewer. Spend some time comparing the two side by side with your partner and making sure you understand both before deciding which version you will base your new code on. You may also create a new version from scratch, taking the best features of each of the two sources. Please be sure to identify your partner in the readme file. Only one of you needs to submit the final program.
Even if you decide to work on this assignment alone, you are encouraged to begin by comparing your solution for the previous assignment to that of others in the class. Doing so may give you perspective on different ways of solving the same problem.
Mapping Software
You may be familiar with the program called Google Earth. (If not, spend a moment looking at the online version. You can also download a program with more features to run on your home computer.) Notice how there are buttons to allow you to move the map view right and left, and zoom in and out. It would be nice if we could do the same thing with the maps you created for the last homework. That is the goal for this assignment.
To make this happen, we will need to change the original MapApplication class, turning it into a MapGUI class to handle the user interaction. Ideally your MapGUI will work as either a stand-alone application or an applet in a web page, but to start you can develop it as a stand-alone application. I suggest starting with ComboApp as the base, and copying into createContents the code from your old MapApplication that you used to set up the map contents.
The GUI
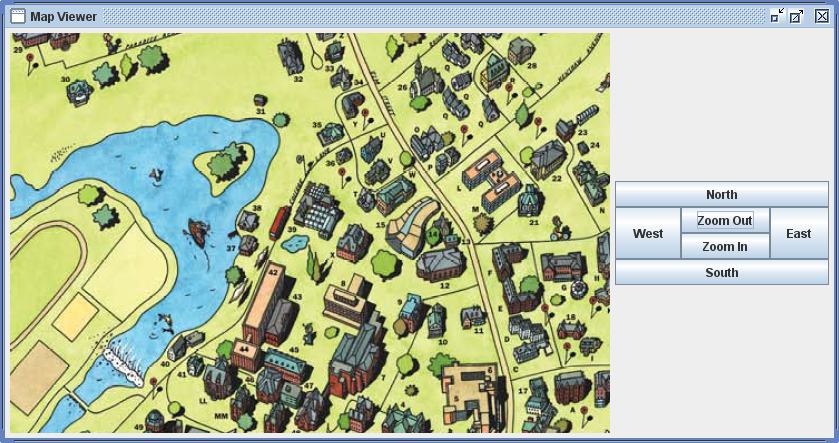
The GUI for your new program should have six buttons: four to scroll the map display in the cardinal directions (by changing the origin/offset point), and two to zoom in and out (by changing the magnification). The scrolling and zooming should change the map view by some reasonable amount, not so much that the user is disoriented nor so little that it takes a very long time to see new areas of the map. For example, scrolling might shift the map by one-third of the visible area. In addition, for a top grade if the user clicks any point of the map, the view should adjust its offset so that the clicked point moves to the center of the visible window. Also, any magnification change should keep the center point of the current view window fixed. A sample of how your GUI might be arranged appears at right.
To achieve the basic goal, you will have to add an ActionListener for each of the buttons. The event handler associated with each ActionListener will need to change the settings of the MapViewer appropriately. (Note: You can achieve this most easily by defining six nested ActionListener classes, one for each button, like the examples in the lab. This is the simplest solution but is somewhat redundant, because many of the buttons do similar things. If you are clever, you can get away with just two nested classes, one for the scrolls and one for the zooms. Each will have to be a little bit more complex than the examples seen in lab: they will have one or two data fields to represent the change being made by a particular button, and they will have a constructor that sets those fields so that a different instance can be created for each button. If all the above seems confusing, please start with the six classes, and only try the more advanced technique if you get it working and have time. You can always go back and try to be clever later once you have got the basic program working!) I recommend that you add one event handler at a time, testing it thouroughly before moving on to the next one.
To make the recentering happen when the user clicks in the map display window, you will need to register a MouseListener with the MapViewer component. (Remember that this is achieved through a call to MapViewer's addListener method; the actual class implementing MouseListener will be nested inside MapGUI. You may not have realized that MapViewer even had such a method, but it must because MapViewer extends class JComponent, which defines it.) The event handler for the MouseClicked event will need to read the location of the mouse click from the MouseEvent record and adjust the offset of the MapViewer accordingly. You will need to do some math to figure out how the offset should be adjusted. (Note that since the only one of the five MouseListener methods we are interested in is mouseClicked, you may wish to have your listener inherit from MouseAdapter, which implements empty methods for all five.)
Regardless of how you implement it, the event handler for mouse clicks in the map window will need to compute a change in the offset to move the clicked point to the center of the window. The simple way to do this is to compute the vector from the clicked point to the center of the window (whose coordinates are half the window's width and height, in pixels) and add this vector to the original offset.
Next see if you can compute a correction to the offset that will keep the center of the visible area fixed as you zoom in and out. Can you? [Help]
Just for Fun
To add some interest to this assignment, I have created a class called MapGrabber. You can download the compiled java bytecode (Java 7, Java 8) and put it in your working directory. (In Eclipse you will have to add it to the project.) Exploring this part is only for students who have completed all the above tasks. MapGrabber is designed to provide you with some interesting maps to explore that you don't need to create yourself. To use it, simply call its the map0 or map1 methods, which return 2D arrays of Color already set up with a map. You can then assign this array to the data field of your MapGrid class. Can you tell what these maps are depicting?
There is also a third method called getMap() that can read a map file from a web URL, so you can import your own maps. Here are the call signatures for all three methods:
static Color[][] map0();
static Color[][] map1();
static Color[][] getMap(String url)
You could make your program check whether there is a command line argument to main(), which would be interpreted as the URL of the map to be displayed. Similarly, the applet version can read the url from a <param> tag.
To Submit
Except when otherwise noted, please be sure that all files are named exactly as described. Only one copy of each file should be submitted, using the course account that comes first alphabetically. Both programmers' names should appear in all files.
- readme.txt, containing your reflections (to be completed individually by each programmer, if you work as a pair)
- MapGrid.java
- MapViewer.java
- MapGUI.java
- MapApplet.html if you create an applet version
- MapGUI.png, a screenshot of your program in operation
- Any other files needed to compile your work
- No typescript is required for this assignment
Quick Start
- Begin with your classes from assignment 2
- Using ComboApp as a starting point, convert MapApplication to MapGUI
- Augment the interface with six buttons that move the view (north, south, east, west, in, out)
- Define and register a MouseListener for the map view, and implement click-centering (also zoom-centering if you haven't already)
Extra Credit
This assignment may be extended in many ways, for varying amounts of extra credit. You can create and post an applet version of your program. (This would be particularly nice if you can get it to load an arbitrary map from an address passed using a <param> tag.) You can add functionality to the interface, so that dragging the mouse causes the map to scroll just as in Google Maps. Or perhaps you could add some buttons that allow the map to be edited. If you wish to pursue this, please discuss it with me first.
If you create an applet version, you should place the web page file (MapApplet.html) along with all the compiled class files (anything ending in .class, but NOT files ending in .java) in the public_html folder of your course account, and set the file permissions to code 644. You should then be able to view your applet in action at the appropriate address (where you fill in the letters of your course account): http://cs.smith.edu/cs212a-xx/MapApplet.html.