shadow is a privileged file
containing the users' login names and their respective
encrypted passwords, along with other information.The purpose of this lab is to enable an experimental feature of the Linux 2.4 kernel: the Device File System (devfs). This file system simplifies device driver development significantly. Because the devfs is built-in in the kernel core (i.e. it is not available as a separate program or device driver), it is necessary to reconfigure and recompile the kernel. In addition, we will need to download and install the devfs management daemon.
The kernel is the heart of the operating system. Modifying the
kernel or even changing its configuration may result in an unusable
machine and in having to reinstall the whole system. Recompiling
the kernel is also very time consuming. For these reasons you
should double-check every step of the lab before modifying or
recompiling the kernel.
IMPORTANT: always make backup copies of the files
that you are going to modify. Put lots of comments in every
file that you create or modify, indicating what you did and why.
Some of the tasks of the labs - such as installing a kernel - require special super-user privileges. You will be granted partial root privileges on the lab's machines. These privileges do not apply to the other computers on campus. As root, aka superuser, you have full control over the system, which means that you have the power to delete critical system files (or even the whole system!) and make the machine unusable. Once again, before you execute a command as root, think two times on what you are doing.
You can execute commands in super-user mode with the sudo
(Super-User DO) command. This is how it works:
sudo <command>
where <command> is the command that you want to
execute as super-user. For security reasons, sudo will ask
for your password before running the command.
For example, try the following commands:
cat /etc/shadowand
sudo cat /etc/shadow |
What are the results? Can you exlpain what happens?
Notice that shadow is a privileged file
containing the users' login names and their respective
encrypted passwords, along with other information. |
The kernel source code is mostly written in C and assembly language. It is located under the
/usr/src/linux-x.y.zdirectory, where x, y, and z indicate the kernel release (version). The current release is 2.4.18. The y number of this code is particularly interesting. By convention, if y is even then the release is stable. If odd, then the kernel is unstable, meaning that some features have not been fully tested and may result in a system crash. The latest releases of the linux kernel can be found at the Kernel Archives website (www.kernel.org).
 |
In these labs we will be working with the Linux kernel 2.4.18. Is this a stable version of the kernel? |
The kernel source tree is organized into the following directories:
archDocumentationdriversfsincludeipcmmnet
Before we can reconfigure the kernel to support the experimental
Device File System, we need to download and install the devfs
management daemon. Download the file devfsd-v1.3.25.tar.gz into your
/root directory. Then extract the file using the
following command:
[root@localhost root]# gtar -xzf devfsd-v1.3.25.tar.gz
The command above will extract the source code of the daemon into
the /root/devfsd directory. Compile and install the
daemon by typing the following commands:
[root@localhost root]# cd devfsd
[root@localhost devfsd]# make devfsd install KERNEL_DIR=/usr/src/linux-2.4
Kernel configuration is possible via a user interface which allows you to select the features that you want include in the new kernel.
Change the current directory to the root of the linux source tree
(/usr/src/linux-2.4/)
cd /usr/src/linux-2.4/Then type the following:
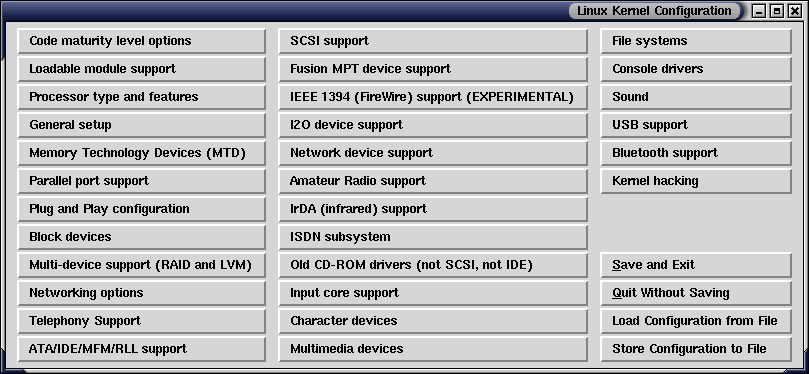
make xconfigAfter a few seconds, the following window should appear on the screen:

Each button corresponds to a different configuration domain of the kernel.
In our new kernel we want to include support for a special file system called Device Filesystem (DEVFS). Because this file system is still experimental (not fully tested), first we need to enable kernel support for experimental features. To do this, click on the Code maturity level options button.

Select "y" as shown above. Notice that each configuration option
has a "Help" button that displays really helpful information about
that option. Often "Help" will tell you which choice is better for
your needs (another very important source of information is the
Documentation directory under the Linux source tree).
Click on the "Help" button and read carefully the information that
it gives you. When you are done, click on "Main Menu" to go back to
the main menu.
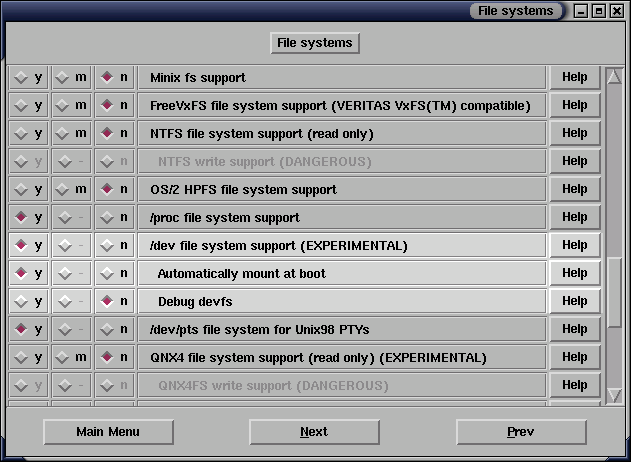
Now it's time to enable the Device Filesystem support. Click on the File Systems button. On the window that pops up, select "yes" for the /dev file system support (EXPERIMENTAL) option, the Automatically mount at boot option just below it, and "no" (default) for the Debug devfs option. This is illustrated by the picture below. Again, you are encouraged to read the "Help" of these three options. When you are done, click on "Main Menu".

Also, in the same configuration window, make sure that the Ext3 journaling file system support is enabled.
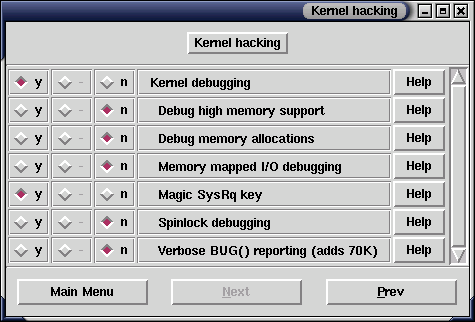
Finally, we want to enable one more special feature, which is located in the Kernel Hacking section. Select "yes" to Kernel Debugging and Magic SysRq key. Everything else should be "no", as shown below.

Congratulations! You are done configuring the kernel. The next step is to save the configuration and compile the kernel. To save the configuration click on the "Save and Exit" button on the main menu window. To compile the kernel, see the next section.
Change your current directory to the linux source root and run
make as following:
   $ cd /usr/src/linux-2.4

   $ make clean dep bzImage
clean will remove old compiled files, dep
will determine dependencies between modules, and, finally,
bzImage will create the kernel image. You will have to
wait about 10-15 minutes for make to finish compiling the kernel.
When make is done, the kernel image is found under
/usr/src/linux-2.4/arch/i386/boot/bzImage
In order to boot your computer with the new kernel, the kernel
image needs to be copied to the /boot directory and
renamed to vmlinuz-2.4.18-devfs-lab. This can be done
in one step:
$ sudo cp bzImage /boot/vmlinuz-2.4.18-devfs-lab
Notice two things:
/boot
directory."devfs" in the file name to
indicate
that the kernel has been built with DEVFS support, and "lab"
to indicate that the kernel has been built during a lab session.
IMPORTANT: be careful not to overwrite other kernel images
located under the /boot directory! Kernel images are named
vmlinuz-*.
Finally, add the following lines to the end of
/boot/grub/grub.conf:
title Linux 2.4.18 Lab
        root (hd0,0)
        kernel /vmlinuz-2.4.18-devfs-lab DEVFS=y
grub.conf is the configuration file of GRUB (GRand Unified
Bootloader), the Linux bootloader. The lines above will allow
you to select the new kernel at boot time.
Now it's time to try the new kernel. Reboot your computer and
select "Linux 2.4.18 Lab" when prompted. You may see
some error messages (FAILED) during the boot. For now we can ignore
these error messages as long as the system does not crash.
